Buying a SIM Card or eSIM in Japan
With its incredible food and long history, dazzling cities coupled with stunning natural beauty, and fascinating mix of high-tech and traditional society, Japan is an incredible country for visitors.
It can also be a confusing one, however. Cities are huge, with a complex (albeit well-oiled) transport network, and there’s often limited amounts of English spoken.
Moreso than most other countries, staying connected makes a trip noticeably easier. You’ll appreciate it whenever you’re translating a menu, checking a train timetable, or just trying to find your way out of yet another sprawling metro station.
Wi-Fi has become more readily available in recent years, but it’s still definitely not available everywhere. Having your own internet connection definitely makes for a simpler, less-stressful experience, especially in smaller towns and more rural areas.
Getting hold of a local SIM card isn’t particularly difficult. That said, with dozens of vendors and a few unusual quirks in the process, it’s not always straightforward either.
For that reason, these days I’m generally recommending most people just set themselves up with a travel eSIM before leaving home instead. They’re cheap and easy to buy and use, and mean you have a working phone before you even get off the plane.
Whichever approach you take, here’s what you need to know getting connected in Japan.
Companies
First up, the bad news: if you’re looking for a SIM card for calls and texts, they’re very hard to find. Law changes in 2006 made it difficult for non-residents to buy voice/text-capable SIMs.
If you’d like one, you’ll need to buy it ahead of time from one of the very few companies that offer it. Fortunately, the same restrictions don’t apply to data-only SIMs.
You can get those sent out ahead of time as well if you’re happy to pay a bit more to be connected on arrival. It’s less of an issue with them, though, since there are so many companies selling tourist data SIM packages of one kind or another in-country.
Need travel insurance for Japan?
Need travel insurance for Japan?
Due to the cellular network types and frequencies used in Japan, you’ll probably end up buying from a company that resells service on the NTT Docomo network.
It’s the most popular and widespread network in the country, though, so that’s not a bad thing. That popularity can lead to congestion and slower speeds, however, especially in major cities.
One of the more popular companies is b-mobile, which offers more data for the money than much of the competition. That’s the company I ended up going with, and it worked well everywhere I went on my three-week trip.
As noted below, though, speeds were often quite slow, and while the purchase and registration process wasn’t too difficult, it did take a bit of time, and mean I was without a working phone for the first several hours of my time in the country.
Travel eSIM for Japan
When I go back to Japan later this year, I’ll just use a travel eSIM instead. Prices are similar if not a little cheaper for the amount of data I’m likely to use, and I can buy and install it at home before I leave in about three minutes.
Of the eSIM companies I regularly use, Airalo has the best pricing as I write this, with a large range of data packs to choose from. They’ve been super-reliable everywhere else I’ve tried them, so I’m more than happy to use them in Japan as well.
The company I recommend for physical SIMs (b-mobile) also sells an eSIM version of its product. It’s more expensive and doesn’t last as long as the equivalent packs from Airalo, though, so there’s no particular reason to go for it.
Like most travel eSIMs, they’re data-only: you don’t get a local number. That’s the same as the vast majority of physical tourist SIMs in Japan as well: as I said earlier, there’s only one company that offers SIM cards with phone numbers to non-residents.
I use apps for everything from communication to transport these days, so the lack of a local number very rarely matters to me, but it’s something to bear in mind if that’s not how you usually travel.
If you’re new to eSIMs, they offer big benefits to travelers in terms of how quickly, easily, and (often) cheaply you can get connected when you arrive in a new country. Most recent phones support them, and you can read all about them here.
How to Buy a Prepaid SIM Card in Japan
b-mobile
If like many visitors, you’re buying a Japan Rail Pass to cover your rail travel around the country, the easiest way to get a SIM card is to just include it with your pass purchase.
Most of the companies selling the pass also sell SIM cards (and rent hotspots). That’s what my partner did, and her pass and SIM kit arrived in the post within three days.
I opted to wait until arriving in Japan. There were several vending machines and staffed kiosks advertising SIM cards and hotspot rentals in the arrivals area at Tokyo Narita Terminal 1, although I didn’t spot a b-mobile machine or seller.
You’ll pay a premium of 10-20% to purchase at airports versus going to major electronics stores like Yodabashi Camera and BIC Camera, which sell b-mobile (and other) SIM packs for tourists.
You’ll typically find them on a rack alongside the dozens of prepaid offerings for locals. It’s easy to spot which is which – the ones aimed at foreigners will be the only ones with English lettering!
I was staying in the Shibuya neighborhood, which had two BIC Camera stores close to the metro station. The Shibuya East store had the widest range of options, including a 21 day / 7GB b-mobile package that wasn’t available at the other store nearby.
The store attendants spoke a little English, but they didn’t need to, since the purchase process was fast and straightforward.
There was a sticker on the packaging saying there was no help or refunds available with that particular pack. The cashier made sure to point it out to me again before ringing up the purchase.
In other words, don’t expect assistance from in-store staff if you have problems. You’d need to contact the b-mobile helpdesk by phone or email if you have any issues.
Setup was straightforward enough using the instructions included in the package I bought. It took around five minutes, and I did it while sitting on the steps outside the BIC Camera store.
The only caveat is needing access to Wi-Fi to do the initial registration. I needed to enter my name, passport number, and a few other details.
iOS devices also need to use Wi-fi to download a carrier profile from a specific URL (http://www.bmobile.ne.jp/devices/bmobile.mobileconfig).
You’ll need to create an APN for Android devices. The details are in the instructions, as follows:
- APN: bmobile.ne.jp
- Username: bmobile@4g
- Password: bmobile
- Authentication type: CHAP or PAP
- MVNO type: SPN (if available)
Prepaid SIM and eSIM Costs
b-mobile
The 21 day/7GB b-mobile package I mentioned above costs 2970 yen (~$21 USD), including tax. There’s also a cheaper 1980 yen (~$14) version that lasts for ten days and has 5GB of data to use.
Airalo
Those prices are fine, I guess, but eSIMs from Airalo are cheaper. Many of them last longer as well, expiring after 30 days. Packs go all the way up to 20GB or more, so you’re unlikely to run out even if you’re cheerfully burning through your data.
They aren’t the only option, though, and I’ve occasionally seen Nomad running specials that makes it the best choice for a certain amount of data. It’s also the only one I’ve seen offering unlimited data packs, which are ideal for heavy users.
Check out the latest prices in the table below.
Topping Up
b-mobile
If your b-mobile SIM expires or you run out of data, you can buy an additional 1GB, valid for just one day, for 500 yen. That’s the only way to top up, though, and is relatively expensive.
It also expires at 11:59pm on the day you buy it, rather than giving an extra 24 hours. Bear that in mind if you run out of data late in the day! Personally I’d probably just go buy another SIM card if I needed to do this for more than two or three days.
Airalo
Topping up with Airalo (or any of the other travel eSIM companies) is done by logging into the website or app. You just select your Japan eSIM, hit the top-up button, and buy the same package again.
The top-up packs have exactly the same pricing and duration as the original eSIMs: there’s little difference between topping up your current eSIM and buying a new one, other than not having to activate it.
Get regular updates from the world of travel tech and remote work
News, reviews, recommendations and more, from here and around the web
Coverage and Data Speeds
Coverage on the NTT network was excellent. Traveling on trains and buses all over the main island of Honshu, I only ever lost signal in long tunnels (and even then, not always).
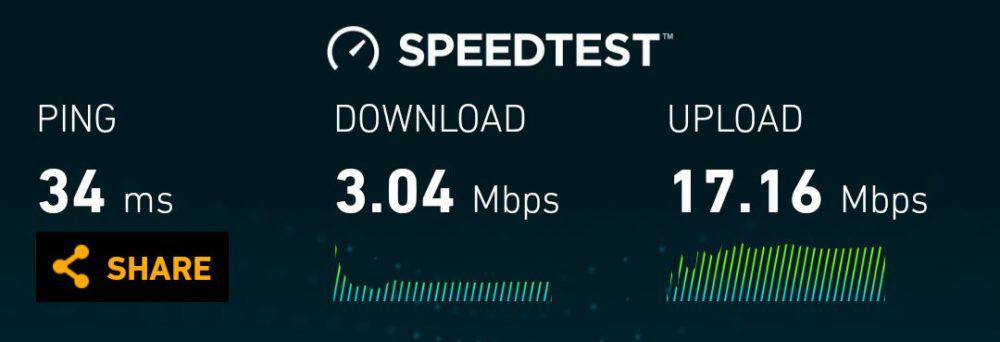
While coverage was fantastic, download speeds were not. As with most resellers that use the NTT network, speeds can get pretty slow during the day. Uploads were often 10x faster than downloads, which I’ve never seen elsewhere in the world.
The worst download speed I recorded was a paltry 0.6Mbps in Shibuya, Tokyo, shortly after purchase. Elsewhere in the city and country it was more normal to see around 1.5Mbps. The fastest I saw was just over 3Mbps.
It was never slow enough to stop me from doing normal tourist activities like maps, email, or web browsing, but streaming video was out of the question. As a result, even using my phone extensively throughout my trip, I used less than half my data allowance by the time I left Japan.
Overall, though, I was still happy enough with the trade-off between cost, convenience, data allowance, and speeds to recommend b-mobile to most visitors who want a physical SIM.
Airalo can use both the Softbank and KDDI networks: between them, you’re likely to get similar coverage to what’s available with NTT, and less congestion. It’s a good thing!
Check out our guides to SIM cards and eSIMs in 70+ other countries here.