Where’d You Take That Photo? The Magic of GPS
Whether you’re a seasoned travel writer or just trying to give good directions to a place, knowing where you’ve been can be critical.
This goes double in countries where street signs seem optional (hello, Thailand!), or a street address doesn’t have any bearing on reality (hello again, Thailand!). Even if you have a street address that’s readily recognized, though, Google Maps sometimes has a tough time with it.
That’s where GPS comes in. With the right hardware and software (which you may well already be using), you can tag every photo you take with GPS information that will identify exactly where you were at the time.
You can refer to those details later, and even view them on a map if you need to. Who needs a notebook and pen, huh?
Here’s what you need to know.
Who or What Is a GPS?
GPS is short for Global Positioning System — you’ve seen it being used in a car (“turn right in… 300 meters” or “reCALculating”) or when finding your current location on your phone. If you’ve heard of geocaching, this 21st-century game uses the GPS system as well.
Up in space, a network of satellites orbits the earth on very precise orbits, circling the earth twice a day.
A GPS receiver (either a separate piece of hardware, or your phone) receives these signals from multiple satellites to triangulate your exact location, down to about five meters of accuracy.
While they’re not always shown by default, the GPS coordinates (essentially, a string of numbers) can help us identify an exact location. Pretty cool, but how does that help us?
Simply put, knowing the GPS coordinates to a place means knowing a constant ‘address’ for an area. It doesn’t matter whether there’s a physical address system in the area or not, and it works with virtually any kind of technology out there.
Much like how a phone number can identify a single phone, a set of GPS coordinates can identify a single location.
What Goes Into a Set of GPS Coordinates?
At its simplest, GPS coordinates are a pair of numbers, separated by a comma. These are all correct GPS coordinates:
- 0, 0
- 37, 74
- 28.10483, -53.29509
- 75.395152, 120.52637
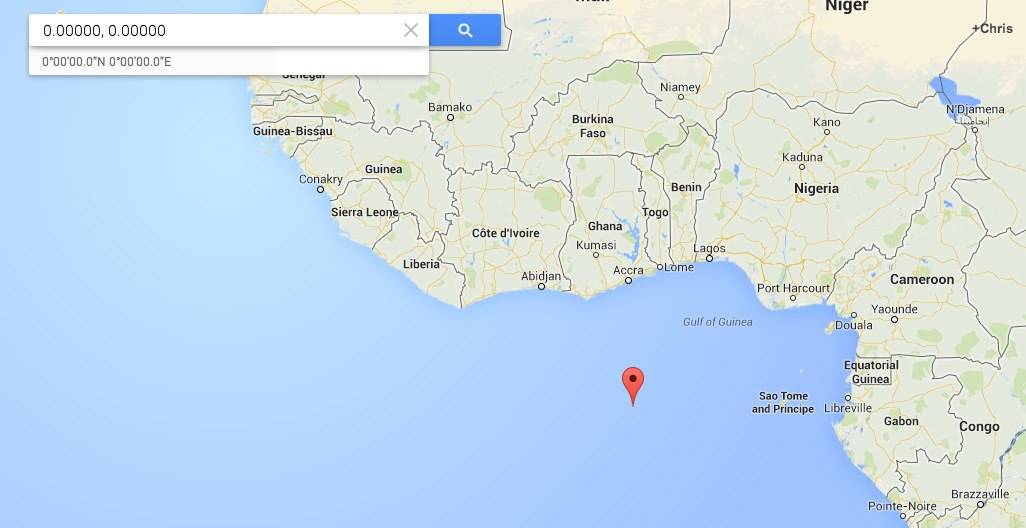
The first number is the latitude (north or south direction.) 0 is the equator, 90 is the North Pole, -90 is the South Pole.
The second number is the longitude (east or west direction.) 0 is the prime meridian which runs through Greenwich, England.
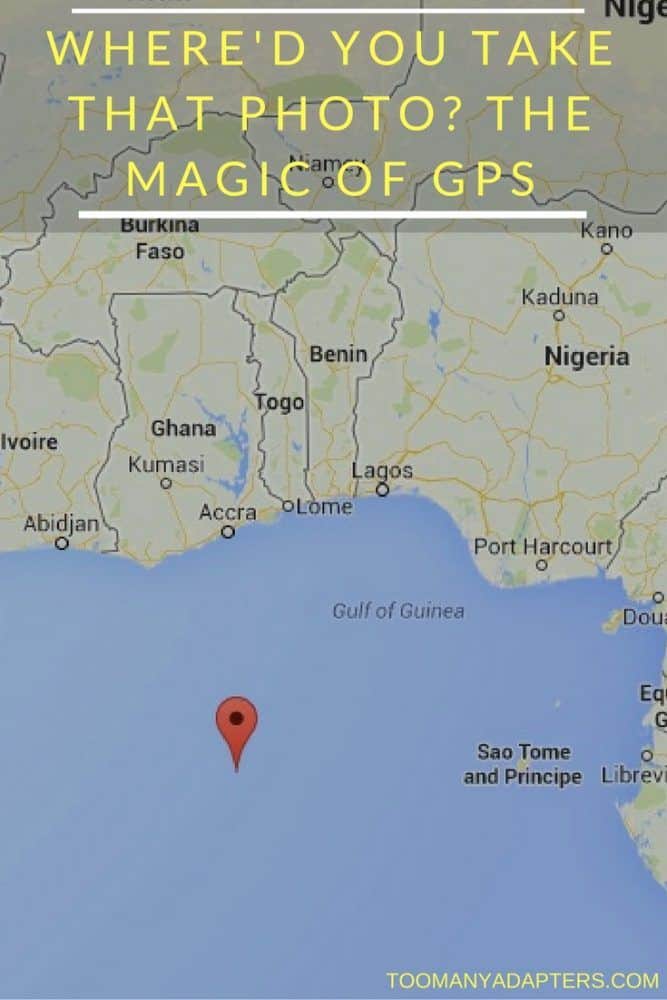
While the Earth isn’t a perfect sphere, we still measure longitude and latitude with degrees. In this system, 0 degrees latitude and 0 degrees longitude equals a point on the equator in the South Atlantic Ocean, about 550 kilometers south of Accra, Ghana:
Some GPS coordinates can be given with a cardinal direction in mind, such as ‘N’ for north or ‘E’ for east. Personally, I ignore those, but you’ll see them used in place of a minus sign.
In other words, 45.3 S 13.7 W means ‘45.3 degrees south of the equator and 13.7 degrees west of the prime meridian.’ In decimals, it would be stated as -45.3 -13.7, since north and east are the default directions.
One more detail: a single degree of latitude is about 111 kilometers , so we’ll need to narrow this down a bit to be useful. Two approaches are common:
Arc-Minutes and Arc-Seconds
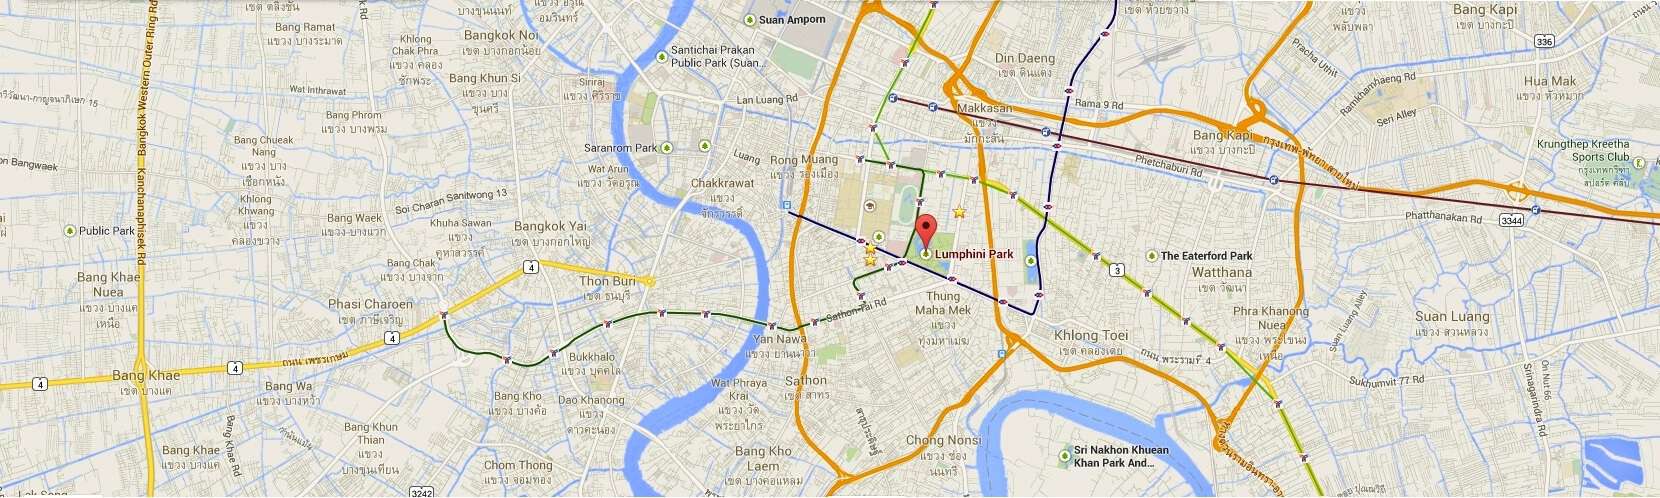
There are 60 minutes in a degree, with 60 seconds in each minute. The coordinates for the Grand Palace in Bangkok, for example, are 13°45’01.2″N 100°29’29.5″E.
That first decimal in the seconds narrows the exact location to about three meters. That’s good enough to tell one building from the next in most cases.
Decimal
Add enough decimals to the degree until it’s precise enough for you. The Grand Palace in this system, for example, is 13.750325, 100.491530.
By default, Google Maps gives you GPS coordinates with six decimal places. That’s good enough to narrow the exact location to about 11 centimeters. This is perfect to identify the front entrance, for instance, or an interesting feature of the building you’re visiting.
While Google Maps supports both, you’ll find it easier to give (and type in) the decimal addresses. You may see the “minutes and seconds” method used by some apps or devices, so don’t get confused. They’ll both work fine.
So Where Did I Take That Photo?
With that admittedly long introduction to GPS out of the way, there are three ways to get the GPS coordinates of where you took a photo (sometimes called ‘GPS tagging’).
Option A: An App on Your Phone or Tablet
First things first – let’s get the device into ‘collection mode’.
On iOS, head to Settings > Privacy > Location Services:
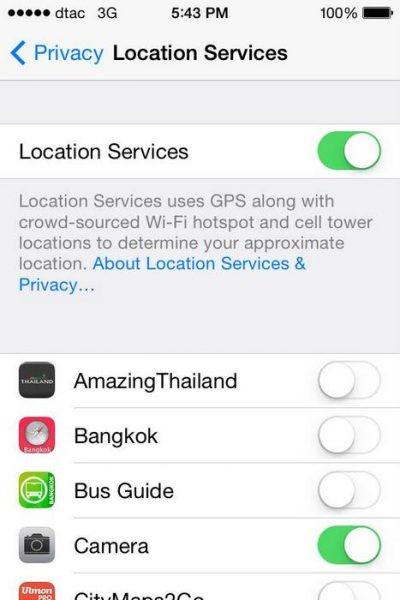
Turn on the Location Services first. In short, the phone’s asking “which services should have access to location data?” Turn it on for the Camera app on iOS and any other apps that you’ll use while traveling (e.g. Google Maps).
On Android, go to Settings > Location (or Location and Security) > ‘Use GPS satellites’. Tap to toggle it on or off. Open the Camera app, then go to Settings (gear) icon. Tap the “Store Location in Pictures,” or “Geo-tag Photos” to get the green checkmark. Things might be a little different depending on the model of phone and version of Android, of course.
Either way, the phone should now be including GPS coordinates in the EXIF data (metadata) that’s part of every digital photo.
Pro tip: give the phone time to determine your current location before you start shooting. It can take anywhere from a few seconds to a minute for the phone to figure out your current location. If you take pictures before it’s locked onto where you are right now, it may add the GPS coordinates from wherever you last were. That’s not ideal.
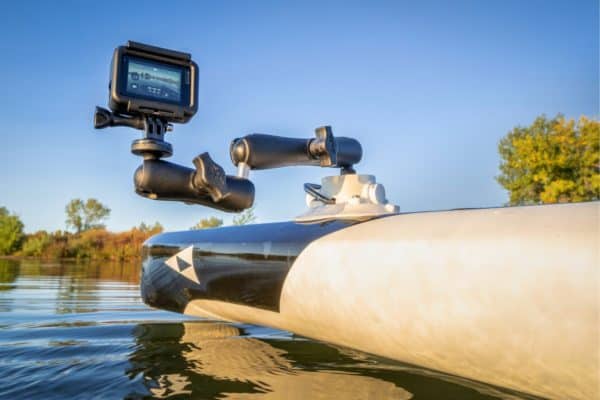
Option B: An Add-On to Your Camera
If I’m shooting with my DSLR, I’ll often just snap a quick photo with my phone as well to grab the GPS co-ordinates for the area. That approach works fine, but it’s kind of a pain, and easy to forget to do. Wouldn’t life be easier if there was some way to get my camera to do it automatically?
Luckily, there is.
GPS Might Be Built In!
Many of the newer cameras on the market have GPS built-in. It can automatically tag the coordinates when you take a picture: just venture into the camera’s settings to enable it.
If you’ve bought a new camera in the past year, definitely check the instructions and look through that menu before dropping more money on an accessory.
But If It’s Not…
If your camera is older, or just doesn’t have GPS as one of its features, there is another option. Various companies make standalone gadgets that can do the hard work for you.
These are not cheap pieces of hardware, although they’re meant to last as long as your camera does, which may help you justify the cost a little more easily. The time they save is also a consideration. Not having to guess or switch between several programs is wonderful. The hardware automatically adds the GPS coordinates the instant you take the picture.
Update: as more and more cameras come with GPS built in, manufacturers have stopped making the dedicated units mentioned below. You may still be able to find them secondhand or from local dealers, however, so we’re leaving the information available for now.
The GP-1A is compatible with the Nikon D5000, D5100, D7000, and D90 models. It connects to the GPS satellites and inputs the coordinates into the photo itself.
Give it a few moments to connect to the satellites, and leave it on so it stays connected.
For the higher-end Nikon’s, you’ll want to check out the Geotagger Pro 2-d GPS unit. It’s a third-party device that runs on its own Li-ion battery, and can also be used as a wireless remote and timer release.
It comes with an AC adapter of its own to keep it charged.
Compatible models: D800, D800e, D4, D3-series, D700, D300-series, D2x, D2xs, D2hs and D200
For some of the newer Nikon cameras, there’s the Geotagger N3-c GPS unit. Powered from the camera itself, this power-efficient device ensures a fast start with a ‘wake up and sleep’ mode to keep you working as fast as you like.
Compatible models: Nikon D600, D7000, D3200, D5100, D5000, D3100 and Coolpix P7700
I haven’t forgotten about you Canon users! The Canon GP-E2 is compatible with the EOS-1D X, EOS 5D Mark III, and EOS 7D, the device can act as a stand-alone GPS logger. The receiver uses a single AA battery to avoid using the camera’s battery.
For other Canon DSLR cameras:
- EOS 40D and 50D: pick up the WFT-E3A.
- EOS 5D Mark II: WFT-E4A.
- EOS-1Ds Mark III and EOS-1D Mark III: WFT-E2A
Get regular updates from the world of travel tech and remote work
News, reviews, recommendations and more, from here and around the web
Great! Now How Do You See Those GPS Coordinates?
If you took the photos with your phone, you have plenty of ways to see those coordinates. My personal favorite is a free iOS app called Koredoko. This will be by far the easiest way to see where a photo was taken.
For Android, check out the free GPS Photo Viewer, which does essentially the same thing.
If you’ve added GPS information to your DSLR shots as above, import the photos to Google Photos, Lightroom, or virtually any other photo management or editing tool. They’ll usually let you see the EXIF data, which is where the GPS data is stored. Many will also show you the location directly on a map.
In Google Photos for Android, for instance, pick a photo you like the look of, then tap the three-dot menu on the top right and choose “Info.”
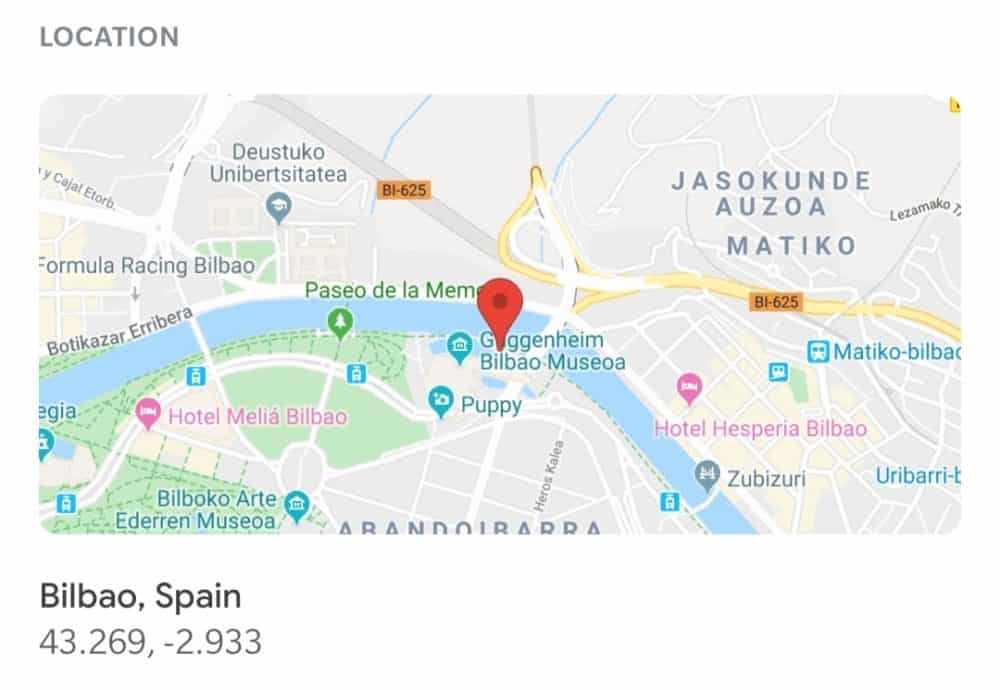
There, you’ll see a bunch of extra information, including the time and date, exposure, and other settings. There’s also a location section with both the actual GPS coordinates, and a Google Map snippet with the exact spot pinpointed.
You can tap on the map snippet to open it in the full Google Maps app, and scroll or zoom around to your heart’s content. Easy!
Now, you no longer have the excuse that you “don’t remember” where you took a photo. You may have to start saying “I’ll have to check my records, let me get back to you,” before handing out the GPS coordinates — and getting people to buy you a drink in exchange for explaining how to use them!
Photo credit: Google Maps (screenshot), my iPhone (screenshot), Google Photos (screenshot)


Good article! I’ll be looking for an integrated GPS tracking next time I buy a DSLR. In the meantime I sort my pictures by date taken and make sure to have a few smart phone shots in between the others. In Picasa that facilitates the geotagging of my other images.
Thanks Sandalsand – I actually considered one of the integrated ones myself – if you know you’ll be sticking with your DSLR for the long-term, it’s a great investment.
I hope more cameras start using geotagging like smartphones do, and when they, hope they use better chips. The current GPS equipments in many brands are simply poor even under best conditions…
As a side note, If you just want a quick and easy way to visualise a photos location online, I would suggest http://www.pic2map.com which utilizes EXIF GPS information to map a photo.
Hi
I have hundreds of site photos that I want to organise into location folders by Street name, so I’m looking to do this in MS explorer. Is it possible to get the GPS data into fields and use a programme like Picasa or something similar to give me the street names in a tabulated format for each photo so I can then file all the photos organised by the street name?
Hi Andy,
It’s a bit beyond the scope of this article, but it sounded like an interesting project, so I spent a bit of time figuring it out for you. Good news — it’s not particularly difficult.
First, download the EXIF extraction tool listed in this article. Tell it the folder that has the photos you want to use, an output file name, and select ‘latitude’ and ‘longitude’ with the checkboxes. You’ll end up with a .csv file that has the name of each file, with its latitude and longitude alongside.
Open the .csv file in Excel (or whatever spreadsheet program you use), and copy the latitude and longitude columns. Now, go to this site, and paste the values into the input box. Select only ‘output address’ from the options in the “Batch Geocode Output Fields” section, and hit the Geocode button. You’ll get a list of street addresses in the output box, which you can copy and paste back alongside the other information in the .csv file. Now, you’ve got a list of file names, with the latitude, longitude and street addresses alongside.
Hope that’s what you were after!
Dave,
That is excellent!!!! and I can’t thank you enough for your help with this.
however, I have one more step to go I think, in order to do what I want to do, which is order all of the photos I have by street name, batch select them and file them into street folders.
In order to do this, I need to now attach the street location names, to the metadata of each of the photos from the .csv file I have now created, so that each photo file in MS Explorer, has a field which now includes its street name, and GPS coordinates (if possible), this would then allow me to arrange all photos by street name, and grab and drop.
Thanks again for your help its fantastic, really appreciate the effort too!
Regards,
Andrew
I suspect this tool will be able to do what you need — take a look at this forum entry in particular. It’ll take a bit of trial and error, though, so be sure you have backups of everything before you start. Good luck! 🙂
please help for all image photo should be merge with latitude and longitude
I think today’s smartphones and today’s wi-fi enabled cameras should be able to talk to each other. I’d like to be able to turn on wi-fi on my camera, connect to the phone and have the camera pick up the GPS coordinates from the phone whenever a photo is taken while connected. At that point I wouldn’t want to save the photo to the phone, as that is time consuming and can be done later …I just use the phone as a geotagger instead of having to cart around yet another device to get that information. As it is now we travel and take a cell phone pictures at every spot we use DSLR’s and then when all the images from the trip are in Lightroom, we copy the GPS coordinates from the cell phone photos to the DSLR photos taken in that location. That’s done fairly easily in Lightroom but it would be nice if the coordinates were already stored with the images instead of having to map them that way. With today’s Wi-Fi technology available in both the phones and the cameras I just fail to see why no app has been written to do this yet.