Everything You Need to Know About Sucking Less at Phone Photography
We may earn a commission from purchases you make after clicking links on this site. Learn more.So you have a smartphone, and think you can take incredible photos with it because it’s just so smart, fancy, and has so many megapixels?
Wrong!
The best smartphone on the market will still produce photos that truly suck if you’re lazy. Meaning, if you’re only pointing the phone towards your subject and pressing the “shutter” button without any other thought or effort put into the capture of an image – you, and not the smartphone, suck.
Smartphones have evolved to replace all kinds of technology we once carried around with us – portable DVD players, GPS navigators, translation devices and music players, as well as our cameras.
With phones pushing their camera technology further and further with each new model, it’s going to seem easier than ever to let your smartphone do all the work.
Don’t let it. The old rules of photography still apply – and will always apply – to any camera you use. So, what are these rules? And how can you stop sucking at photo capturing on the go?
Before I talk about rules, there has to be a Golden Rule. It’s summed up best like this: Nothing I write will matter if you, the user and person carrying around a smartphone, do not want to take better photographs. Results only occur with effort.
Focus and White Balance
For instance, if you have an iPhone, white balance is controllable, and the better photography apps let you lock in this setting before you even take a picture. Check out ProCam 8 — as long as you ignore the cumbersome name, you’ll find it’s a full-featured app that copies almost all of the important manual settings for photographers, including white balance control.
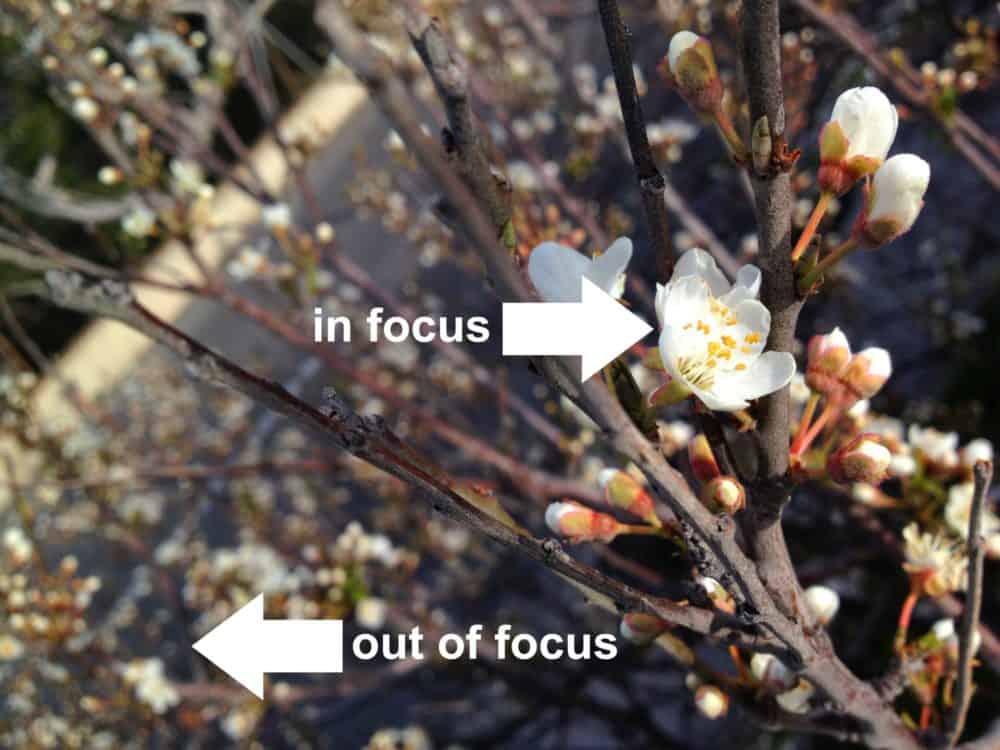
Forget the word smart in your phone’s name. I assure you that when it comes to knowing what to focus on, your sophisticated calling device with a camera in it is thicker than a box of bricks. You need to tell it what to focus on.
Doing this, as well as telling it how to expose, will instantly help improve the quality of the images you take from “Seriously? WTF!” to “Now you’re talking.”
Misho Baranovic, one of the most talented photographers to use smartphone technology in the world, says “the best camera is the one you know how to use. Learn to control your focus and exposure.”
The best photography apps all have these settings built-in, and all smartphones have focus control built into the native camera. So, how do you beat your smartphone into focusing submission?
It’s at this point that I usually hold up my finger in a classroom setting and say, “Your finger is your best friend.” Depending on the audience, this sometimes elicits a few snickers and half laughs. But seriously, your finger is your best friend.
It is what I use to touch on the screen of my iPhone so that it knows: 1) where to focus, and 2) what to expose for. It’s the little trick that you should master if, for some strange reason, nothing else I tell you sinks in.
Where do you go from mastering focus and exposure? Let’s not get hasty: just because you now know how to focus and set exposure doesn’t mean you’ve mastered anything. But, for the sake of this article, let’s also talk about composition.
Composition and the Rule of Thirds
Most smartphones have, built-in to either their native camera or most third-party photography apps, a setting called “grid” or “lines.” Whatever the name, this setting places lines over your image in a grid formation that represents the old photography ‘Rule of Thirds’.
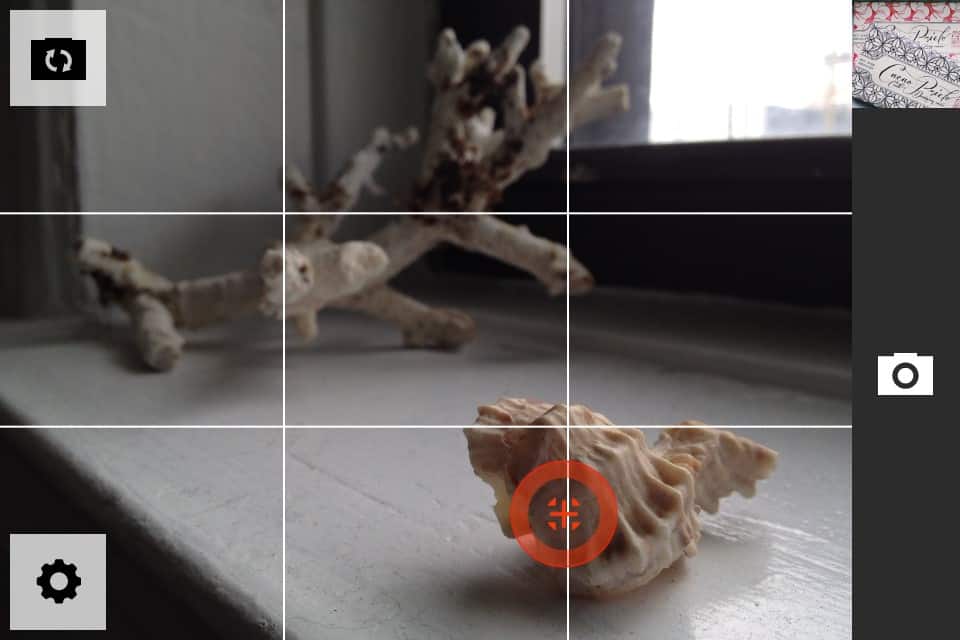
If you compose your shot before pressing the shutter button to include your primary subject either at the intersection of two lines, or in the outer quadrants of those gridlines (basically, anywhere but right in the middle,) you’ll automatically be creating a photograph more pleasing to the human eye than any which does not follow this rule.
Once you’ve followed this rule for a while, then you can go about learning when to break it.
No More Filters
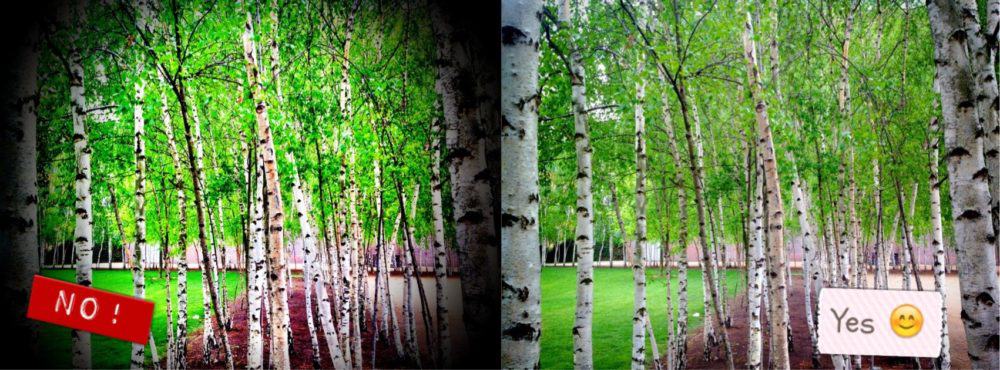
The next thing you should do, is erase from your phone any app that allows you to apply filters and obnoxious effects like extreme color and heavy vignettes. You can always reinstall them if you really want to. Why should you do this?
Because, and I know you are going to be shocked by this, photography is not the application of filters. Good photographs are not good because of their effects. Great photos are never ever great because of the filters applied to them.
Just like the mastery of the Rule of Thirds, you shouldn’t be using a filter until you know how to capture a photograph that needs no post-processing. Filters and effects can be used to imbue more fun into the creation of an image but they can’t ever make a bad photograph good.
If you’re relying on apps, you’re doing it wrong.
Black & White and HDR
A possible “exception” to this rule might occur in the case of apps that allow you to convert a color photograph into a black and white image. Photographers like Ansel Adams and Dorothea Lange knew what they were doing when they built their careers on colorless-photographs.
Sometimes the absence of color is the very thing that adds all of the emotion and story into a photograph without detracting anything from a subject. Play around with toning, and find the apps that allow you the most control. These are the ones that go beyond applying a filter to let you also control contrast, highlights, and exposure.

Don’t use selective color apps. Don’t share a photograph that’s partially black and white with some color. Do not let me find ColorBlast! or Color Splurge on your phone. If I need to explain why, you need far more than this one post to suck less at photography.
Use HDR sparingly. It’s not a toy. It’s like filters, the golden rule here is: I shouldn’t be able to tell it’s “an HDR image.”


More Pixels, Less Flash
On another note, every day I notice brands and individuals uploading images that are so pixelated, the subject is somewhat of a mystery. This is particularly obvious on Instagram, but it happens everywhere. Just because digital images are easy to share and upload doesn’t mean they all need to go online.
Be picky with the pictures you share and if you don’t have a high-enough resolution image, don’t share it. It is always better not to share than to share a pixelated or poorly-edited photograph.
Turn off the “auto flash” setting on your smartphone. The flash should only be going off when you tell it to, and hardly even then. Smartphone flash technology hasn’t yet evolved far enough to do much more than mess up a photograph. Play around with it until you know when it can better your image, and never use it unless it will.
Cropping and Aspect Ratio
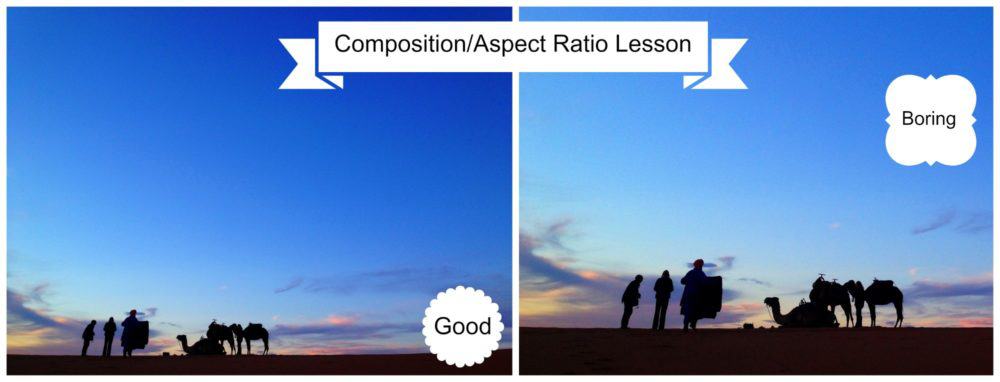
Don’t be square! Remember that you can shoot and share images in almost any aspect ratio with a smartphone. This means you have almost endless possibilities, and the option to change and crop at will. Pay attention to your subject, and capture an image in a format that best represents your subject.
If you’re photographing the Grand Canyon, for instance, think about using the built-in panorama feature. If you are photographing a group of five people, don’t try and fit them into a vertical crop — turn your smartphone and take the photo horizontally instead.
Get regular updates from the world of travel tech and remote work
News, reviews, recommendations and more, from here and around the web
Fewer Selfies
Let’s wrap this up by having a moment where we talk about proper subjects. Whenever I check Twitter, Facebook, and Instagram these days I notice the majority of the images could be labeled as ‘selfies,’ and I’m sick and tired of it.
I like you, I do, but just because that smartphone you have fits in your pocket and has this cool front-facing camera which makes it really convenient to take a photograph of yourself does NOT mean that’s ALL you should use it for.
I know it’s easier to do with a smartphone than it was with a dSLR or point-and-shoot, but here is where easier does not make it right. Show me the world around you instead.
Be a storyteller with your smartphone, not a narcissist. Social media will thank you. You’ll find your friends you thought you’d lost returning to you. You might even get a Nobel Peace Prize. Well, that last one is probably not true.
But if you don’t understand me, then you’re probably most guilty of my main point: don’t allow sophisticated technology to make you lazy. Use it to be MORE creative, not less. Suck LESS and at the very least you’ll never have to endure another blog post or conference talk from me ever again!
All images via author

Thanks for giving me a forum to share these tips guys!
Great advice. Using a smartphone to get decent pictures is not that easy. The limitations of the small sensor in less that great light is a very limiting factor.
It’s definitely limiting, Alan. I completely agree. However, if you learn to work within the limitations and use a tool like the iPhone to its full advantage, it can also be a really powerful little camera 😉
I was not aware of the most of the apps you mention here, so thank you for this information. I enjoy taking photos with my iPhone but am still learning all the ways I can improve my photos that I take with it.
So glad you found the app info helpful, Jenna!
Like your style. Too many iphone blogs are a bit too dry and techy. The colour splash tip made me laugh. But rules are there to be broken too. I have 2 photos where I used colour splash on an Instagram feed of about 1,600 pics. And that goes for the blessed rule of thirds too ; )
Hi Richard! Glad you like the style, this is the way I talk but not always the way I write. I was grateful to the TMA guys for pushing me to be a bit snarky in presenting this information 🙂 And as you said, rules are meant to be broken for sure! But I think people should learn to follow the rules before they break them. And I’ll forgive you for the color splash images 🙂 2 in 1,600 isn’t so bad I suppose!
I suck at photography, but I read your entire post because you write like a guy. A funny guy.
NYC rocks! Have a blast. Wish I’d gotten beyond Manhattan.
I hope it’s ok if I take that as a compliment, Kate?! And yes, NYC does rock. I’m grateful I get to call it home but am still able to travel a bit. Cheers! 🙂
I had no idea that my iPhone can do all of those things you mentioned. Thanks for sharing!
Well, then you’re my exact target market 😉 I am so glad you found this article and I hope it really helps you.
“Results only occur with effort.” // “Be a storyteller…not a narcissist.”
Love your post, Kirsten! Keep up the good work of inspiring people to share the world around them. xx
Thank you so much, Bethany!! I am glad you found something useful here and agreed with my points. (Of which you definitely pulled out the two most important IMO.)
Much love to you back. xx
Hi!
This was very usefull! thanks!,i’m becoming a pastry chef, i make cakes and stuff, and when i love it, i take pictures but sometmes i don’t have my camera with me and with the phone i can’t get it right, the colors, the lights it´s all wrong, do you have any advice for this kind of pictures??
thanks a lot!
Sorry if i write anything wrong, english it´s not my first lenguage (LOL)
Catalina From Chile
Hi Catalina,
I’m sure Kirsten will leave a comment as well, but thought I’d mention that we’ve also just published a post devoted to getting better food shots – you might also find it helpful. 🙂
Hello Catalina! Great question. Food photography is definitely something that people are doing with their iPhones to great advantage. Check out the images from ‘Legal Nomads” , Alice Gao, Marte Marie Forsberg, etc.
I prefer to use the Hipstamatic Foodie Snap Pack for most of my food photographs and I always prefer natural light to artificial. Also, try apps like Pro Camera, 645 PRO Mk II and VSCO cam because they let you set the focus and exposure which is almost more important to food photography than to the other types.
If you need more tips, definitely see the article Dave posted a link to and feel free to message me privately if I can help you out in any other ways! Cheers!
Thanks ! you were right that was a great articule about food shoot real helpfull
thanks!
thank you !!
i will defently try de apps !
and the article was very helpfull too!
Thanks !